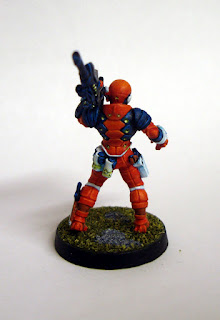
Los tres intruder que se pueden ver aquí vinieron de dos blisters distintos. El básico, que tiene uno con fusil combi y otro con fusil de francotirador, y el de HMG.
Una cosa curiosa es que en el básico me vinieron dos brazos con fusil combi, pero claro, ambos son el brazo derecho, y el que lleva el rifle de francotirador es el brazo izquierdo. Si el brazo extra es la norma, es un buen gesto, pero me parece que resultaria un poco dificil usarlo para crear una conversión.
These three intruders which can be seen here came from two different blisters. The basic one, which includes one with combi rifle and other sniper rifle, and the HMG one.
A curiosity is that on the basic blister came two arms with combi rifle, but both arms are the right arm, while the sniper rifle arm is the left one. If the extra arm is the norm, it's a nice gesture, but I think it would be a bit hard using it for a conversion.
La pose del intruder con fusil combi puede parecer algo rara a primera vista, hasta que te fijas en que se está preparando para arrojar una granada. Diría que el problema es que no he puesto bien los brazos, pero la foto oficial también está en una pose rara, parece más bien que está provocando al enemigo.
The combi rifle intruder posture may look weird at first, until you notice he is preparing to throw a grenade. I would say the problem is that I didn't glue the arms on the right position, but on the official photo it also has a weird posture, it looks more like he is taunting the enemy.
Las peanas son preparadas por mi, usando masilla de Andrea. Son simples de hacer. Una vez has extendido y aplanado la masilla sobre la peana de plástico solo hay que hacer esto:
- Dividir la masilla en cuadrados iguales (piensa que dos de esos cuadrados han de cubrir la planta de un pie).
- Dar textura a los cuadrados con una piedra pequeña.
- Una vez esten bien secos, tras por lo menos un día, se rellenan las separaciones entre cuadrados para crear los adoquines.
- Se da textura con una piedra pequeña a la masilla recien añadida.
- Una vez ha secado todo bien, ya puedes taladrar y anclar la miniatura.
I made the bases, using Andrea putty. They are easy to make. Once you have extended and smoothed the putty over the plastic base you only need to do this:
- Crisscross the putty to create identical squares (think that these squares must cover a foot base).
- Give texture to the squares using a small stone.
- Once they are well dried, after at least a day, you fill the space betwwen the squares to create the cobblestone.
- Give texture to the new putty using a small stone.
- Once it has dried completely, you can drill it and anchor the miniature.
Como se puede ver, ahora el negro se ha vuelto mucho más azulado. Despues de pintar la interventora vi que ganaba mucho de esta forma.
De hecho, basándome en lo que vi con este color cambié la forma de la que pinto el naranja, añadiendo nuevos colores, que parece mejorar el resultado. La nueva progresión es: rojo sangre, rojo cadmio claro, naranja y naranja claro (todos de Vallejo), mientras que antes usaba solo rojo sangre y naranja claro.
As it can be seen, the black now is much more bluish. After painting the female interventor I saw it improved a lot this way.
Actually, after what I did learn with this color I changed the schema to paint the orange, adding new colors, which seems to improve the result. The new progression is: blood red, orange red, clear orange and light orange (all from Vallejo), while previously I only used blood red and light orange.


